[How-To] Building Your Own Social Networking Site. Part 4 - Installing Wordpress & BuddyPress Introduction
[How-To] Building Your Own Social Networking Site. Part 4 - Installing Wordpress & BuddyPress Introduction
By : Bijay Acharya / studentvideotutorial
- Well welcome to part 4 of How-To series on "Building Your Own Social Networking Site".
- In this part, I'll show you how to install "Wordpress" in your domain or sub-domain. And I'll give you basic introduction to "BuddyPress". Both of these will be later on utilized in building our own social networking site.
- To follow along with this series, please read my previously posted parts, i.e. Part 1, Part 2 and Part 3 on Building Your Own Social Networking Site. Because, I'll be skipping a lot of steps during installation of Wordpress. So, if you follow previous parts first, then this installation process will be a lot easier.
Ok, let's begin . . .
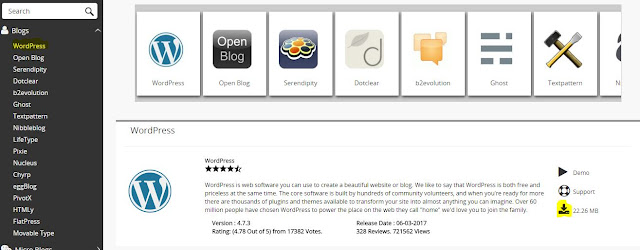
Step 1 : Enter to the following screen as shown in image below. And click download/setup icon as shown in "Wordpress" section. (icon is highlighted, and size is 22.26 mb).
Step 2 : You will get following screen. Click "Install Now" as highlighted below.
Step 3 : After clicking "install now", you will get following screen. Now, fill up your required details. Like, where to install wordpress, username, password, and email details (i've shown this in earlier part while installing peoplepods. So, please follow that part in any confusion)
Step 4 : (Remember, I'll install it in my sub domain as I've shown in previous parts. You must choose your own domain or sub domain). Now, look at the bottom of installation section, you'll get to choose 'theme' as shown below. Select any one theme and install it. Later on, with buddypress plugin, we will modify our site.
Step 5 : On success, you will get following screen with admin url to login.
Step 6 : Now click that 'admin url'. It may or may not ask you to login. If it asks for login details, then provide your 'username' and 'pass' and log in to Dashboard of Wordpress. When you successfully login, then following screen will appear.
Well, this was about setting up our wordpress for "building our own social network site". In next part, we'll see how to install "buddypress" plugin to this wordpress site and how we can modify it for "building our own social network site"
Below you will find some details and introduction on about "BuddyPress".
- Visit this official site for each and every detail on buddypress.
- Are you looking for modern, robust, and sophisticated social network software? BuddyPress is a suite of components that are common to a typical social network, and allows for great add-on features through WordPress’s extensive plugin system.
Ok, this is it. Stay tuned for next part.
By : Bijay Acharya / studentvideotutorial
- Well welcome to part 4 of How-To series on "Building Your Own Social Networking Site".
- In this part, I'll show you how to install "Wordpress" in your domain or sub-domain. And I'll give you basic introduction to "BuddyPress". Both of these will be later on utilized in building our own social networking site.
- To follow along with this series, please read my previously posted parts, i.e. Part 1, Part 2 and Part 3 on Building Your Own Social Networking Site. Because, I'll be skipping a lot of steps during installation of Wordpress. So, if you follow previous parts first, then this installation process will be a lot easier.
Ok, let's begin . . .
Step 1 : Enter to the following screen as shown in image below. And click download/setup icon as shown in "Wordpress" section. (icon is highlighted, and size is 22.26 mb).
 |
| image source : blogs section in softaculous app installer (screenshot) |
Step 2 : You will get following screen. Click "Install Now" as highlighted below.
 |
| image source : blogs section in softaculous app installer (screenshot) |
Step 3 : After clicking "install now", you will get following screen. Now, fill up your required details. Like, where to install wordpress, username, password, and email details (i've shown this in earlier part while installing peoplepods. So, please follow that part in any confusion)
 |
| image source : blogs section in softaculous app installer (screenshot) |
Step 5 : On success, you will get following screen with admin url to login.
Step 6 : Now click that 'admin url'. It may or may not ask you to login. If it asks for login details, then provide your 'username' and 'pass' and log in to Dashboard of Wordpress. When you successfully login, then following screen will appear.
Well, this was about setting up our wordpress for "building our own social network site". In next part, we'll see how to install "buddypress" plugin to this wordpress site and how we can modify it for "building our own social network site"
Below you will find some details and introduction on about "BuddyPress".
- Visit this official site for each and every detail on buddypress.
- Are you looking for modern, robust, and sophisticated social network software? BuddyPress is a suite of components that are common to a typical social network, and allows for great add-on features through WordPress’s extensive plugin system.
- BuddyPress is focused on ease of integration, ease of use, and extensibility. It is deliberately powerful yet unbelievably simple social network software, built by contributors to WordPress.
- Or, you can see image below.Ok, this is it. Stay tuned for next part.


Comments
Post a Comment