[How-To] Building Your Own Social Networking Site. Part 1 - Introduction & Softaculous Walk-through.
By : Bijay Acharya / studentvideotutorial
Hello everyone. Welcome to my new 'how-to' series on 'Creating/Building your own Social Networking Site from Scratch'.
(Note : Video Lab/Demo of this part is available at bottom of this article)
I'll randomly pick up any 2 of them, and I'll teach you how to install it in our domain. (or in my case, www.socialnetwork.studentvideotutorial.com)
Step 5 : Ok, let's start installing 'PeoplePods' in our domain. At first, give a look at image below.
Step 6 : Now, let's install it. Click 'download icon' as highlighted in above image. Screen like below will appear.
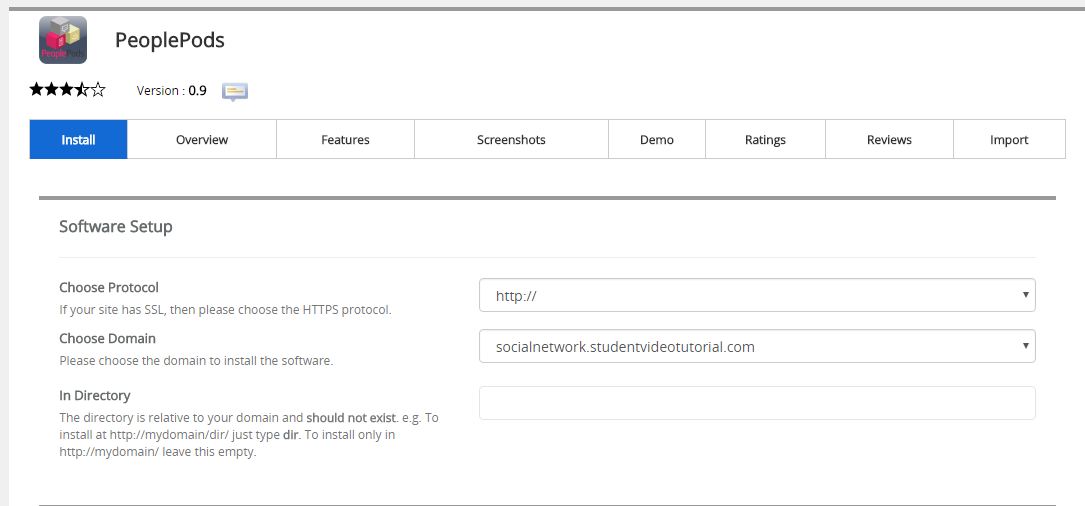
Step 7 : Click 'Install Now' as highlighted in image above. Now, go through each image given below. (only view images. Do not change anything.)
Step 8 : Now, in fig 1. Select 'domain name' (where people pods) will be installed. In my case, I've chosen subdomain. Leave 'directory' blank.
In fig 2, fill admin email, assign username and set admin pass.
Finally, below 'install' assign email, where details of installation will be sent.
Step 9 : Now, click 'install'.
On success, you will get following screen.


Original Course Source Here : https://bhudki.com/courses/building-your-own-social-networking-site/
By : Bijay Acharya / studentvideotutorial
 |
| image source : softaculous peoplepods (in my cpanel - screenshot) |
(Note : Video Lab/Demo of this part is available at bottom of this article)
- Always remember, there are various ways of building our site as an Social Network Site.
- Way 1 : Using Wordpress Plugins.
- Way 2 : Using Softaculous App Installer.
- Way 3 : From Scratch, .i.e. Fully manual coding/Programming level.
- Way ......(lot more).
- Initially, I'll provide you demo on how we can use 'Way 2', i.e.Softaculous App Installer to create our own Social Networking Site.
- Later on, I'll show you how we can use 'Way 1', i.e. Wordpress Plugins to create/build our own Social Network Site.
- Before starting, please make sure that you've "one domain name, atleast 500mb space/quota". (You don't have it ? Get it from me, send message to me. Click here to send message)
- In my case, I've prepared a sub-domain as :
www.socialnetwork.studentvideotutorial.com where I'll create my Social Network Site for this step-by-by guide on "Building Social Networking Site"
Let's begin. . .
Step 1 : (Assuming that you got Domain & Space). Go to your cpanel, and find "Softaculous App Installer". Refer image below for more detail.
 |
| image source : Paper Lantern cpanel (screenshot) |
Step 2 : Click on that highlighted 'Softaculous Apps installer'. Screen like below will appear.
 |
| image source : softaculous (full screenshot). In addition, wordpress+abantecart+prestashop logo |
Step 3 : Notice 'Blogs' & 'Social Networking' ? Well, at first I'll provide demo on using some of the platforms inside that highlighted 'Social Networking'. Click 'Social Networking'. Screen like below will appear.
Step 4 : Notice those highlighted names. Well, each of those can be used in creating social networking site. But, anyone must use them depending upon requirement.
 |
| image source : softaculous (in my cpanel - screenshot) |
I'll randomly pick up any 2 of them, and I'll teach you how to install it in our domain. (or in my case, www.socialnetwork.studentvideotutorial.com)
Step 5 : Ok, let's start installing 'PeoplePods' in our domain. At first, give a look at image below.
 |
| image source : softaculous (in my cpanel - screenshot) |
 |
| image source : softaculous (in my cpanel - screenshot) |
 |
| fig 1 |
 |
| fig 2 |
In fig 2, fill admin email, assign username and set admin pass.
Finally, below 'install' assign email, where details of installation will be sent.
Step 9 : Now, click 'install'.
On success, you will get following screen.

- You will get 'Administrative URL'. Click that. And you will get to screen below.

- login with email and pass that you provided while setting it up.
Screen like below will appear on success.

- Well, now you got what you need, i.e. "Basic Social Networking Site".
- you can create posts, groups, edit your profile, upload pictures, share links, add friends, e.t.c.
Ok, this was first part on Building Your Own Social Networking Site with 'peoplepods' via 'softaculous apps installer'
In next part, I'll choose next toolkit from 'softaculous apps installer' and walk you through installation process.
Stay Tuned. And below you're getting video demo/lab of this part.
Comments
Post a Comment