[How-To] Building Your Own Social Networking Site. Part 5 - BuddyPress Installation & User Registration
[How-To] Building Your Own Social Networking Site. Part 5 - BuddyPress Installation & User Registration
By : Bijay Acharya / studentvideotutorial
- Well welcome to part 5 of How-To series on "Building Your Own Social Networking Site".
- In this part, I'll show you how to install "BuddyPress" in your wordpress site and walk you through its configuration.
Let's begin . . .
Step 1 : Go to Plugins Section and click 'Add New'. Following screen will appear.

Step 2 : You are seeing 'BuddyPress' in first. Click 'Install Now'. And after it is installed, click 'Activate'. Refer image below.
Note : In case, if BuddyPress doesn't show up in first, then search it from search box located in right side of screen.

Step 3 : Following screen will appear. Notice, 'Activity' Field is added. (As highlighted in image below)

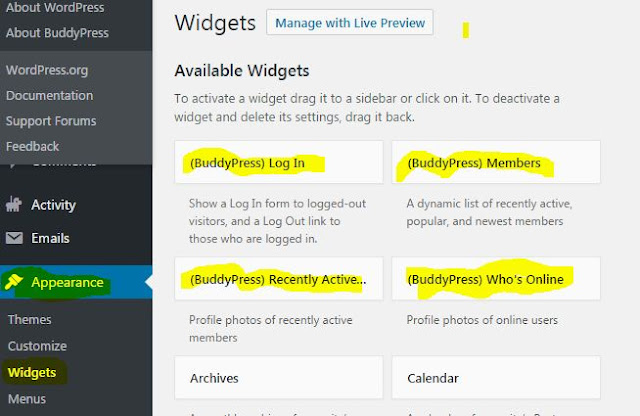
Step 4 : Now, click on Appearances and then Widgets as shown in following screen, notice highlighted sections.
- BuddyPress Log in
- Buddypress Members
- BuddyPress Recently Active
- BuddyPress Who's Online
Step 5 : Now, before proceeding ahead, open your website where you installed 'wordpress'. In my case, it looks like following. No additional widgets added in sidebar and footers.
 Step 6 : Get back to Dashboard > Appearances > Widgets.
Now Drag & Drop all 4 available widgets to Primary Sidebar. Screen like below.
- BuddyPress Log in
- Buddypress Members
- BuddyPress Recently Active
- BuddyPress Who's Online

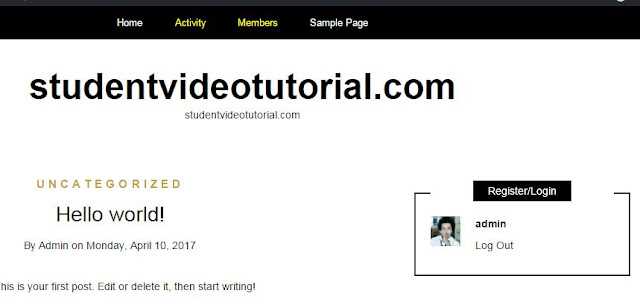
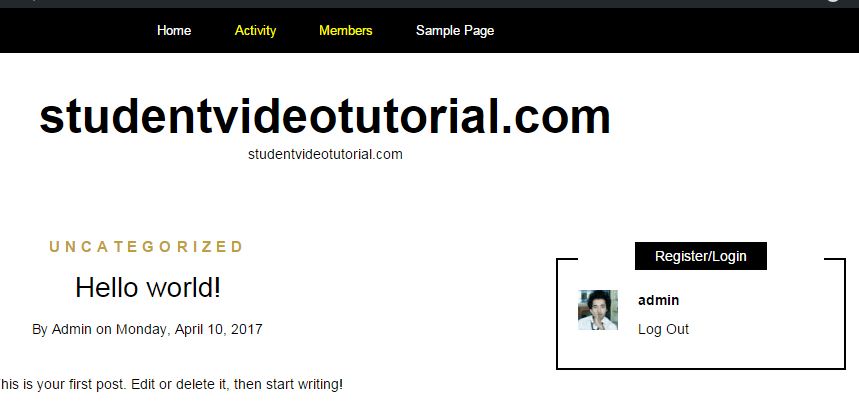
Step 7 : Now, again open your website and look difference there. In my case, it looks like as shown in image below. (Notice, 4 widgets added in right side)

Step 8 : Notice, in Register/Login Section at right top ? That, "Register/Login" was added while adding widget in Primary sidebar. You can do it once you start a demo on it. And notice next thing, that "Log out" ??? Well, now I'll log out from my site/dashboard because I want you to show something first. Then screen like below will appear.
 Step 9 : Notice that highlighted "Log in" ? Well, now how New users can register to your site ??? Because that section is only showing 'Log in". Right ? Well, lets login again.
Step 10 : Once you log in, go to Settings > General ... & tick mark that 'Anyone can register' and assign role as subscriber. As highlighted in image below.

Step 11 : Now, lets check whether 'register' field is added or not. I'll log out and then show you the website screenshot. Notice highlighted 'register' below.

Step 12 : Notice that highlighted 'register' ? Well, good job. Now new users can register with their own email and username to your site.
Let's log in again.
Step 13 : Now go to Appearance > Menu . . . and tick mark that display location as "Primary Menu". As shown in image below.
- Make sure, "Activity" Page is added to Menu structure as shown below.
- Click Create Menu and Save Menu.

Step 14 : Now, see your website again. You will get this new menu tabs. As shown in image below. Also notice, 'Activity' & 'Members' tab added there.
 Step 15 : Now, Click 'Activity' tab. Following screen will appear.

Well well well, now you can update your activity (post status, links e.t.c.)
Ok, this is it for now. We are going to see lots of settings of BuddyPress in next part. BuddyPress is awesome. Stay tuned.
By : Bijay Acharya / studentvideotutorial
- Well welcome to part 5 of How-To series on "Building Your Own Social Networking Site".
- In this part, I'll show you how to install "BuddyPress" in your wordpress site and walk you through its configuration.
Let's begin . . .
Step 1 : Go to Plugins Section and click 'Add New'. Following screen will appear.

Step 2 : You are seeing 'BuddyPress' in first. Click 'Install Now'. And after it is installed, click 'Activate'. Refer image below.
Note : In case, if BuddyPress doesn't show up in first, then search it from search box located in right side of screen.

Step 3 : Following screen will appear. Notice, 'Activity' Field is added. (As highlighted in image below)

Step 4 : Now, click on Appearances and then Widgets as shown in following screen, notice highlighted sections.
- BuddyPress Log in
- Buddypress Members
- BuddyPress Recently Active
- BuddyPress Who's Online

Step 5 : Now, before proceeding ahead, open your website where you installed 'wordpress'. In my case, it looks like following. No additional widgets added in sidebar and footers.

Now Drag & Drop all 4 available widgets to Primary Sidebar. Screen like below.
- BuddyPress Log in
- Buddypress Members
- BuddyPress Recently Active
- BuddyPress Who's Online

Step 7 : Now, again open your website and look difference there. In my case, it looks like as shown in image below. (Notice, 4 widgets added in right side)

Step 8 : Notice, in Register/Login Section at right top ? That, "Register/Login" was added while adding widget in Primary sidebar. You can do it once you start a demo on it. And notice next thing, that "Log out" ??? Well, now I'll log out from my site/dashboard because I want you to show something first. Then screen like below will appear.

Step 10 : Once you log in, go to Settings > General ... & tick mark that 'Anyone can register' and assign role as subscriber. As highlighted in image below.


Step 12 : Notice that highlighted 'register' ? Well, good job. Now new users can register with their own email and username to your site.
Let's log in again.
Step 13 : Now go to Appearance > Menu . . . and tick mark that display location as "Primary Menu". As shown in image below.
- Make sure, "Activity" Page is added to Menu structure as shown below.
- Click Create Menu and Save Menu.

Step 14 : Now, see your website again. You will get this new menu tabs. As shown in image below. Also notice, 'Activity' & 'Members' tab added there.

Well well well, now you can update your activity (post status, links e.t.c.)
Ok, this is it for now. We are going to see lots of settings of BuddyPress in next part. BuddyPress is awesome. Stay tuned.
Comments
Post a Comment